
The First Things You Should Do with Your New Windows 11 Computer - Part 2

This is part 2 of my series on what I suggest you do in terms of setting up your new Windows 11 computer! This process includes removing unwanted and pre-installed junk software, disabling startup items, choosing a web browser, updating programs, sleep and hibernation settings, Windows notifications, and more!
Remove Pre-Installed Software
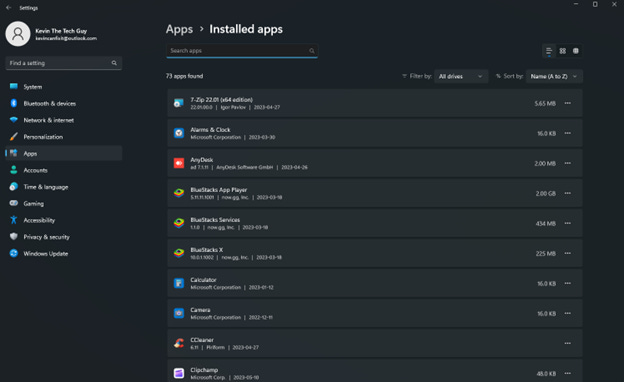
For decades, Windows has come with pre-installed software. Some of it is from Microsoft itself, but they also partner with different vendors to include their software. Either way, you may not want some of it, and it might just clutter up your hard drive as a result.

To remove unwanted programs and apps, left-click the Start Menu, then click ‘Settings’, then go to ‘Apps’. Left-click each one you don’t want and click ‘uninstall’. When in doubt, be cautious and pay attention to removing what you don’t use. Otherwise, go with your gut on this. You know what you don’t need or use, so don’t be afraid to get rid of things.
Disable Startup Items

You’d be amazed at how many apps and programs are scheduled to start automatically when you log into Windows. Again, some are from Microsoft, and some are from pre-installed programs and apps. Some may even be programs and apps you’ve chosen to install but don’t need on startup.
For example, you may seldom use Zoom. It doesn’t need to constantly be on startup and running in the background. You can manually open it and start using it. Another example is Microsoft’s OneDrive, a Dropbox competitor. This is a pre-installed app, but if you don’t use OneDrive, you might as well disable it on Startup. You can also uninstall the app itself from your computer per the previous step in this post.
To disable Startup items, right-click an empty area of the Taskbar as described above, and left-click on “Task Manager”, then on “Startup” on the left-hand pane. You can right-click any Startup item and choose “Disable”. Or, left-click the item to select it, and left-click the “Disable” button in the top right of this window.
Windows Notifications
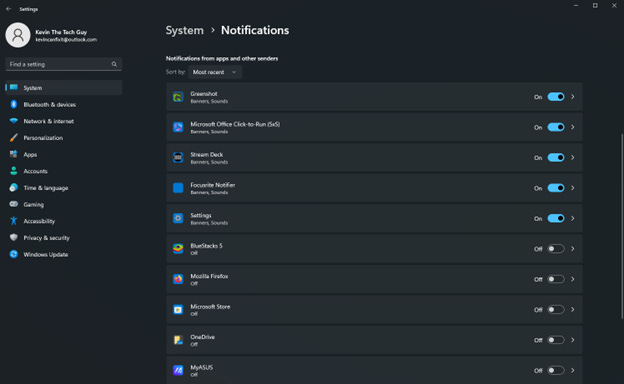
Out of the box, every single installed app can show you notifications as little pop-up messages at the bottom right of your screen above the System Tray that includes the clock and so forth.
To manage these notifications, first open the Start Menu. Then, click on “Settings”, next head over to the System page, and choose “Notifications” on the left-hand pane. There are sliders for each app you can enable or disable. You can always change these later. These settings can be particularly useful for those who find notifications overwhelming or distracting.
Your Web Browser of Choice

Microsoft includes Edge, which is its browser in Windows 11. This browser is usable, but ONLY after you change several settings. I go more in-depth in THIS SUBSTACK POST, so please check that out. Otherwise, you only need to use Edge long enough to head over to PatchMyPC.com. Their all-in-one standalone installer for over 300 commonly used free programs will get you the browser you really wanted.
Using PatchMyPC to Install The Free Programs You Want
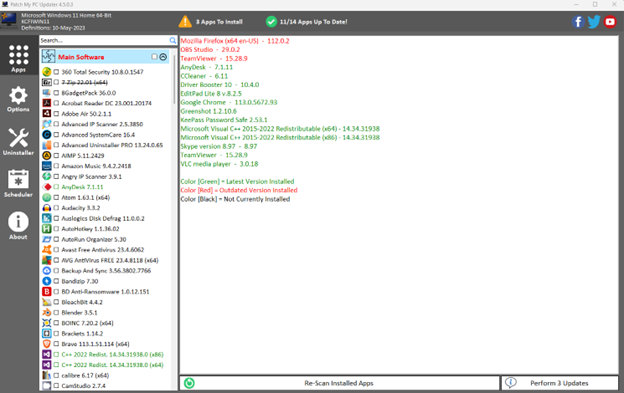
For a better view, I cover PatchMyPC in a separate newsletter post.
I recommend using Firefox, Chrome, or even Brave. I prefer Firefox and Chrome. Some websites don’t play nice with one or the other, so it’s good to have both at hand.
When you open your browser for the first time, it’ll give you the option to set it as the default, and I recommend doing that. This means that whenever you click on a link, for the most part, it’ll open in that browser.
Hibernate and Sleep
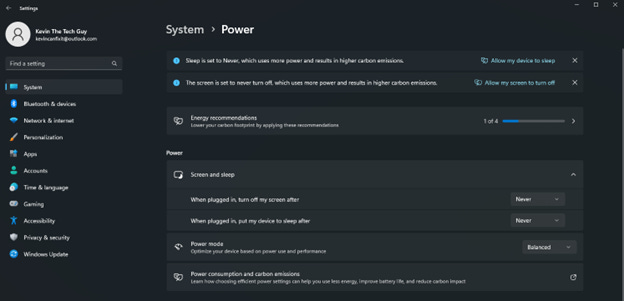
These are especially important settings for laptop users, but the default settings can also be a real pain on a desktop computer. Sleep means it will stop sending a signal to your monitor after a period of inactivity. Windows will go into a low power mode but should wake up fairly quickly and go back to normal when you become active again.
Hibernate is a lower-power mode pausing everything but non-essential Windows services while doing everything to conserve power. That’s why this setting is ideal for laptops that aren’t plugged in. Windows might not even show you Hibernation settings on a desktop computer because it’s always plugged in.
You can access both sleep and hibernation by going into “Settings” via the Start Menu. On the “System” page”, click on “Power” and change what you want to change.
Show File Extensions
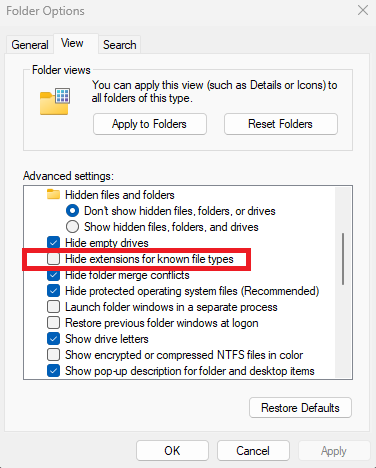
Every version of Windows hides file extensions. Microsoft considers this an insignificant feature, but I disagree. Windows already knows what kind of files each item is and how to open it. This isn’t always clear to the user. So, turning on file extensions makes that clearer at a glance if you’re savvy enough to be aware of that sort of thing.
Turn off Windows 11 Lock Screen Ads and Tips
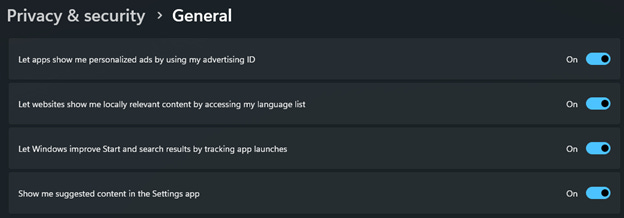
Windows 11 displays different tips and even ads on your lock screen, where you enter your password to log in.
To disable these and just have a photo there, open Settings via the Start Menu. Click on “Privacy and Security”. Under “Windows permissions”, click on “General”. Then, switch next to “Let apps show me personalized ads by using my advertising ID”, and “Show me suggested content in the Settings app”.
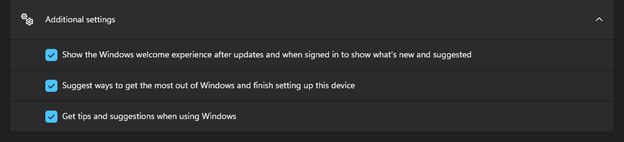
Then go back to the “System” page and click “Notifications”. Scroll down to “Additional Settings” and click it. Uncheck “Offer suggestions on how I can setup my device”, and “Get tips and suggestions when I use Windows”.
Enable System Restore
You can use System Restore to revert to when things worked in your computer’s history. For example, before a change was made or a program was installed. It creates a current image or system snapshot. Many of these can be stored, but that can also take up space over time. It’s important to enable this in the event something does go wrong. It will be a last resort before resetting Windows and potentially starting from scratch.
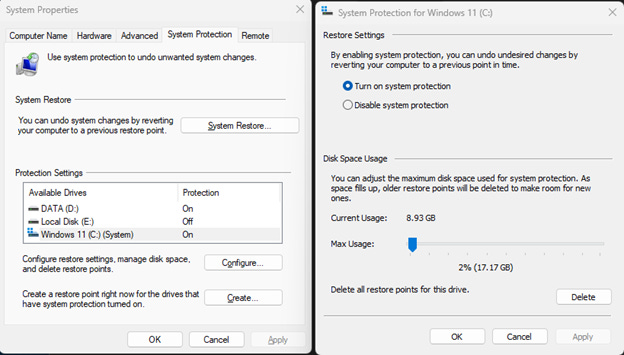
Open the Start Menu, click “Settings”, then search “System Restore”. Click on “Create a Restore Point”. Under “Protection Settings”, select your hard drive, likely “C:”, and click the “Configure” button.
Now, select “Turn on system protection”, then hit “Apply” and “OK”.
You can also click the “Create” button, but I reserve creating restore points just before installing programs. Some programs will even prompt you to do so.
Whew, all done! At least in terms of setting up Windows 11 for the first time or after doing a full factory reset of Windows. There are thousands of settings in Windows, but these are the initial settings I would focus on to improve your experience daily.
Thank you so much for reading, and for supporting my work! Check out KevinTheTechGuy.ca for more!